Projects from 9th Grade
Abstract
Materials:
-Paper
-Pencil
-Color Pencils
-Black Marker
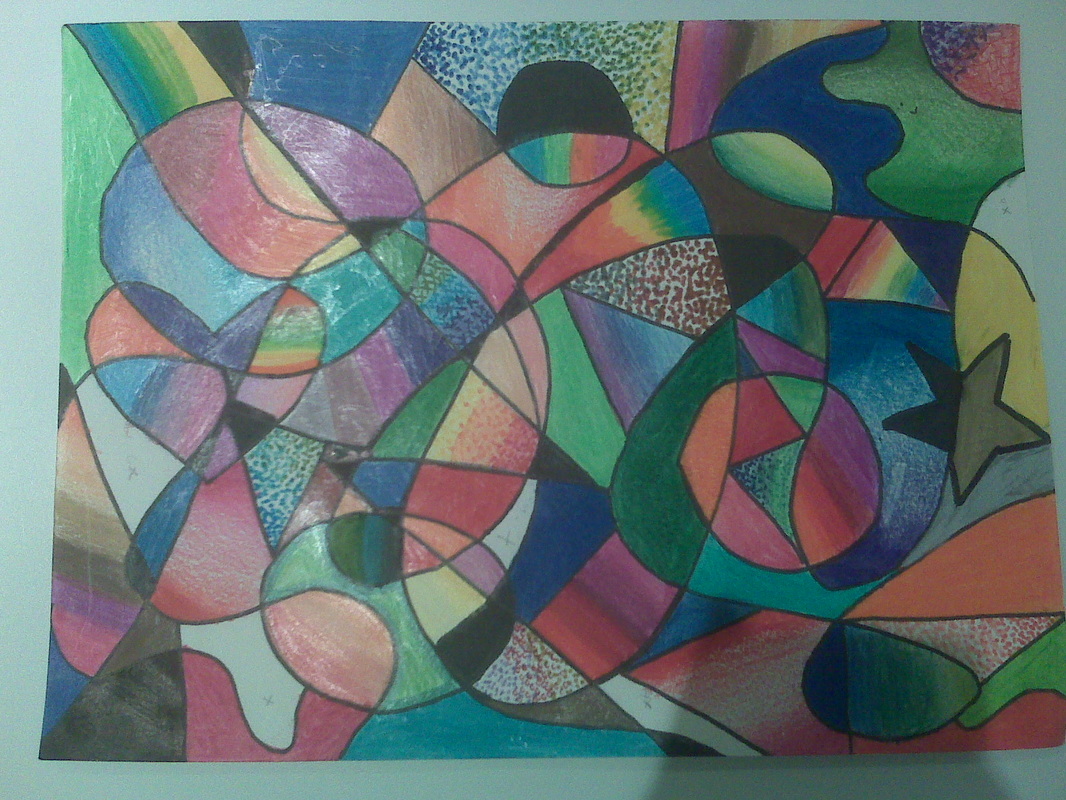
The abstract was the project I liked the most this year for many different reasons. One of the reasons was because of how colorful every abstract was I think colors make people happy and smile and fill you with positive thoughts. Another thing I love about this project is how all abstracts were similar in a way but at the same time different because they all seem to be similar colorful, full of shapes and lines but no abstract was exactly the same. I like this because I connect it with humans, we are all similar in ways we have eyes, ears, mouth, etc. but we all have different personalities as well as many other different things. The goal for this project we were given during the middle of the school year was to practice shading using the different types of shadings we were taught, and to be extremely creative. Even thought this project seems to be our fully creation we were given a rubric that had things we had to put on our abstract. Like for example, four lines beginning and ending at the edge of the paper, five circles, four triangles, one diamond, one line that looks like waves, two lines that look like lighting, three lines that are curvy, six short lines, one long line, and four shapes. Some of theses things you can still find in the abstract easily however most are hard to find or identify. We had rules for coloring also, like for example make red turn into orange, orange into yellow, green into yellow, etc. however we could repeat these rules as much as we wanted. Another requirement we had for this project was apply the shading techniques, gradation, pointillism, cross-hatching, we could leave no shapes in white, and we had to have and odd number of shapes filled in with a dark color marker.
Some of my strengths when doing this project were coloring and using the specific shading techniques, because I love working with color and mixing colors and creating different color patterns. I also knew very good techniques to be able to apply gradation, pointillism, and crosshatching in a very artistic way. My weaknesses when doing the abstract were creating all of the lines and shapes required so that it turned out looking with shapes I liked and patterns I liked. In fact, I had a first try that was very unsuccessful I was unsatisfied with the patterns of my lines and shapes so I started another one been more careful with were I put my lines and my shapes creating patterns I liked. Finally, my abstract looked just the way I expected it to colorful creative, with a very precise pattern, detailed very successful and it accomplish all the goals and had all of the requirements of the rubric. I think my abstrac is perfect just the way it is I wouldn't change anything from it the only thing I would improve is being more careful when outlining it with black.
Materials:
-Paper
-Pencil
-Color Pencils
-Black Marker
The abstract was the project I liked the most this year for many different reasons. One of the reasons was because of how colorful every abstract was I think colors make people happy and smile and fill you with positive thoughts. Another thing I love about this project is how all abstracts were similar in a way but at the same time different because they all seem to be similar colorful, full of shapes and lines but no abstract was exactly the same. I like this because I connect it with humans, we are all similar in ways we have eyes, ears, mouth, etc. but we all have different personalities as well as many other different things. The goal for this project we were given during the middle of the school year was to practice shading using the different types of shadings we were taught, and to be extremely creative. Even thought this project seems to be our fully creation we were given a rubric that had things we had to put on our abstract. Like for example, four lines beginning and ending at the edge of the paper, five circles, four triangles, one diamond, one line that looks like waves, two lines that look like lighting, three lines that are curvy, six short lines, one long line, and four shapes. Some of theses things you can still find in the abstract easily however most are hard to find or identify. We had rules for coloring also, like for example make red turn into orange, orange into yellow, green into yellow, etc. however we could repeat these rules as much as we wanted. Another requirement we had for this project was apply the shading techniques, gradation, pointillism, cross-hatching, we could leave no shapes in white, and we had to have and odd number of shapes filled in with a dark color marker.
Some of my strengths when doing this project were coloring and using the specific shading techniques, because I love working with color and mixing colors and creating different color patterns. I also knew very good techniques to be able to apply gradation, pointillism, and crosshatching in a very artistic way. My weaknesses when doing the abstract were creating all of the lines and shapes required so that it turned out looking with shapes I liked and patterns I liked. In fact, I had a first try that was very unsuccessful I was unsatisfied with the patterns of my lines and shapes so I started another one been more careful with were I put my lines and my shapes creating patterns I liked. Finally, my abstract looked just the way I expected it to colorful creative, with a very precise pattern, detailed very successful and it accomplish all the goals and had all of the requirements of the rubric. I think my abstrac is perfect just the way it is I wouldn't change anything from it the only thing I would improve is being more careful when outlining it with black.
Abstract
Find some of the shapes I included in my abstract. ;)
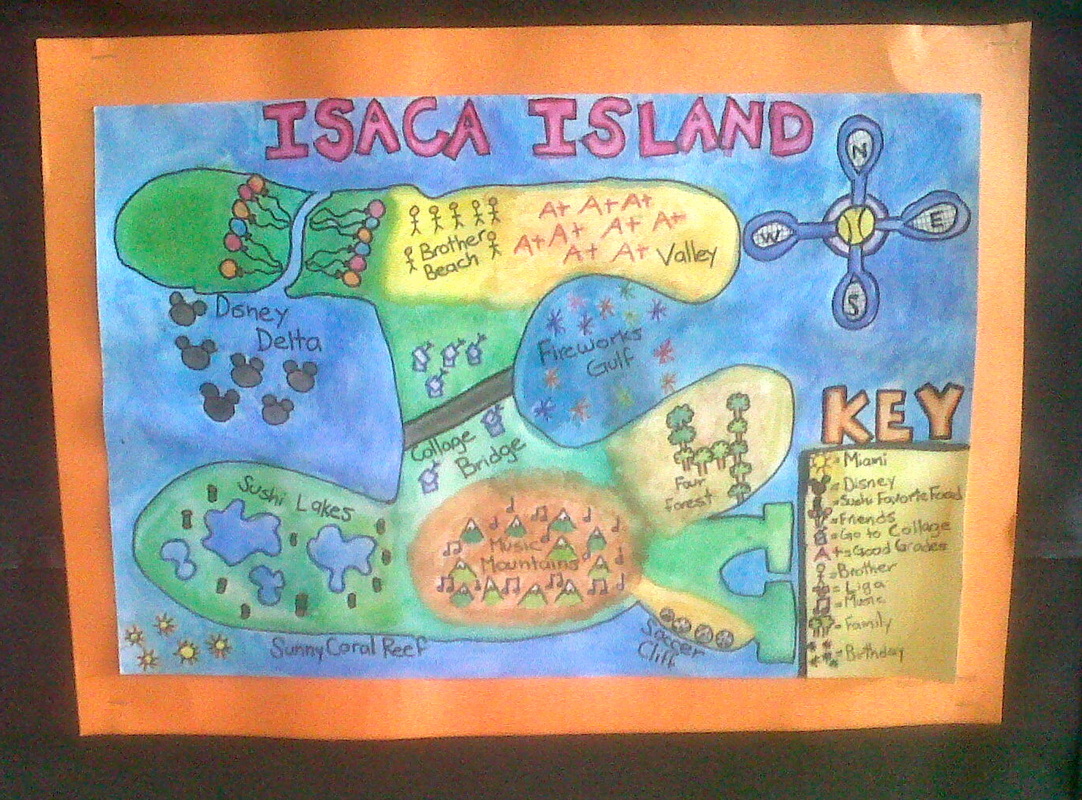
Symbolic Map
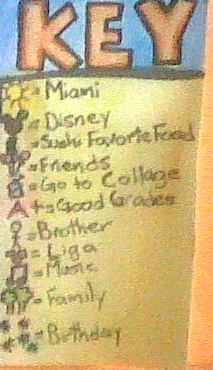
Map Key
Symbolic Map
Materials:
-Pencil
-Paper
-Watercolors
-Paint Brush
-Watercolor Pencils
-Color Cardboard (orange frame)
When doing this project I had a lot of fun. It took me many classes as well as many steps to finish this project. The first thing we did was take water color notes, so that we were able to use and work with watercolors in a successful and creative way, we learned wet on dry, wet on wet, using salt, work water color pencils, water color wash and water drops. Mrs. Lopez our art teacher gave us this project with the goal to get us to know us better, since it is the first year she teaches us. The second thin we did after learning how to work with water colors was make a list of Symbols as brains storm for some of the things we were going to put on our maps. For the map we were given a rubric, which required ten things about us, seven land features (in my map as you can see, reef, cliff, valley, peninsula, mountains, forests, lakes, gulf, delta, bay, and a river.) 3 things from our past, (in my map the sun, which symbolized that I used to live in Miami, the fireworks which represented my birthday, and the stick people which represented my brother who is 2 and a half years younger than me) one goal for our future (in my map the bridge, which symbolized me graduating and going to collage) , a rough draft, a map key, and a compass rose. After, have a brainstorm of the symbols that symbolized us and knowing the things our map had to have I created the rough draft. Finally the final copy of my Symbolic Map which was very similar to my rough draft but instead of been colored with color pencils I colored it with watercolors. I loved working with watercolors because of how easy to mix the colors together and to correct little mistakes. I map was very successful, I used great craftsmanship when drawing and coloring, though I do think I could have done my drawings more perfect and detailed. I loved the title of my map it reflects me and my map Isa my name (Isabela) “Ca” for my last name, also my best friends (18h sketches) call me Isaca.
I also liked working on this project because I think symbolism is very important in art. It os a great way for an artist to express themselves and communicate things through paintings. I also think it is important because things could symbolize one ting for one person and another thing for an other person. From my point of view it is a way to represent things that are important to you but hidden so that only you know what they truly symbolize.
The part of the project I thought was my strength or the easiest was using water colors and painting the final draft. I loved using water colors to put some color on to my map, I had never worked with water colors using them in such a careful way and for so much details. The part I thought was my weakness or the most frustrating one was creating the rough draft and finding a symbol for everything. I thought this took a lot of imagination, creativity, and concentration, so that you could make sure all your symbols were kind of understandable for others. Something I wish I could change or improve about my map is I would have practiced using watercolors more. So that I could use them in a more creative way and do more things, for my map to look better, more colorful, and more realistic.
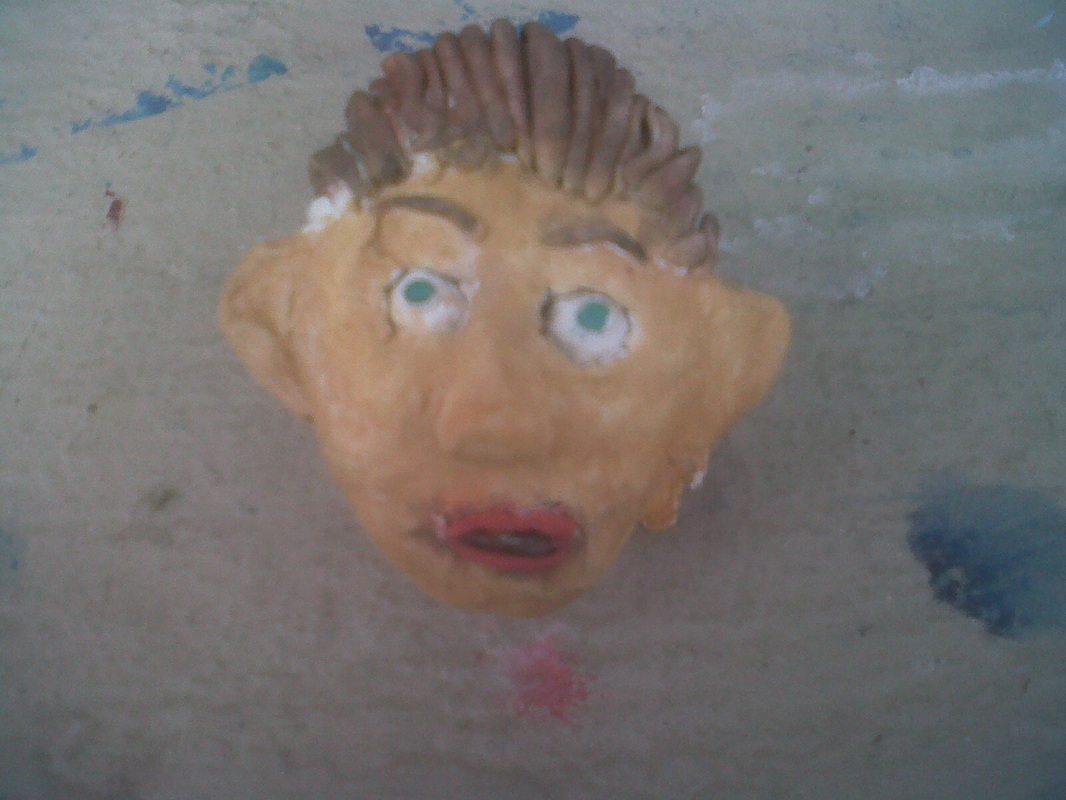
Clay Head
Clay Head
Materials:
-Clay
-Watercolors
-Tooth picks
-Water
This year we were taught about the face and it’s proportions in other words, facial proportion, how far apart the eyes are, how far apart is the moth from the nose, were your ears should start and end, etc. To apply what we were learning about facial proportion we did some projects on it. We did a half-portrait (see the imagine on my sketches page), we drew a very basic and simple face, and we did a clay head, as you can se the image here (clay head). The goal of the clay head was to apply facial proportion in a three dimensional way. There were many steps to this project. It was a very challenging project for me because I couldn’t be as precise as when you are drawing a face in two dimensions. What I mean by this is that it was the first time I worked with clay to create a face with such small details like the eyes, the pupils, the mouth, the eyebrows, etc. We had no specific guidance. I had to do two holes using the tooth picks were I would place in each two little balls of clay (eye-balls) and on the balls two even smaller balls the pupils. Some of the difficulties I had when doing this project were finding and creating the specific sizes and shapes for the different parts of the face using clay. Another of my weaknesses when doing this project was using the correct amount of clay and that each part was in the correct place according to my facial proportion notes. When painting my weaknesses were to paint with out leaving white spots or without painting other parts of the face. However my strength when doing this project was using the toothpick to add details to the sculpture and to make some parts of the face.It was very hard to do everything the same size, each ball, each ear, each eyebrow. However, even though it was difficult and challenging to do a clay head, I had lots of fun doing it I learned about face proportion even better and on a different way. My project was very successful and helped me develop working in 3D (with clay) and learning patience. Something I would have liked to done better or something I would like to improve from my clay head is taking more time for doing everything, each part of the face, and for painting it. I think i should have used my time more wisely.
